Welcome back, fellow applique enthusiasts! Today, we will be looking at how to prepare freezer paper templates for hand applique. As we continue to explore the fascinating world of applique techniques, we can’t overlook the significance of proper template preparation. In our previous post, we discussed the wonders of hand applique using freezer paper and liquid starch. Now, it’s time to dive deeper into the essential steps of preparing your freezer paper templates. Get ready to elevate your applique game and unlock the secrets to achieving impeccable precision and stunning results. Let’s get started!
1. The Importance of Preparing Freezer Paper Templates
 Before we delve into the nitty-gritty details, let’s take a moment to understand why preparing freezer paper templates is an essential step in this particular hand applique process. Freezer paper templates serve as the blueprint for your applique design. They provide structure, precision, and ease during the stitching process. By dedicating time and effort to their preparation, you set yourself up for success and ensure a smooth and enjoyable applique journey.
2. Selecting the Right Freezer Paper
When it comes to preparing freezer paper templates, not all freezer papers are created equal. It’s crucial to choose a high-quality freezer paper that is suitable for your applique project. Look for freezer paper that has a shiny coating on one side, as this is the side that adheres to the fabric when heat is applied. Additionally, opt for a sturdy freezer paper that can withstand the cutting and handling process without tearing or losing its shape.
3. Tools and Materials for Template Preparation
To prepare your freezer paper templates, you’ll need a few essential tools and materials. Here’s a list of what you’ll require:
- Freezer paper: As mentioned earlier, choose a high-quality freezer paper with a shiny coating on one side.
- Fabric: Select the fabric you’ll be using for your applique design. Make sure it is clean, pressed, and ready for template transfer.
- Pencil or pen: Use a sharp pencil or a fine-point pen to transfer your design onto the freezer paper.
- Scissors: You will need two types – one for paper, for precise cutting of the templates, and one specifically for fabric. You know the rule… nobody touches your fabric scissors!
- Seam allowance marker: Use a fabric pencil or marker that will not smudge or stain your fabric.
4. Step-by-Step Guide: Preparing Your Freezer Paper Templates
Now, let’s dive into the step-by-step process of preparing your freezer paper templates for hand applique:
Creating the Design:
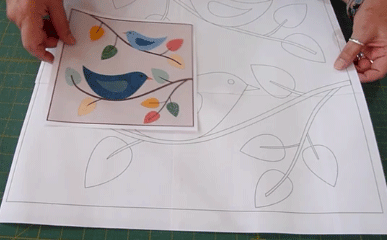
 Before you can start preparing your templates, you need to have a design in mind. Sketch or print out your design on paper, ensuring that it accurately represents the desired size and shape of your applique pieces. If your design is asymmetrical, you will need to mirror your design first, to make sure that the fabric pieces are oriented in the correct direction when you begin to applique the shapes.
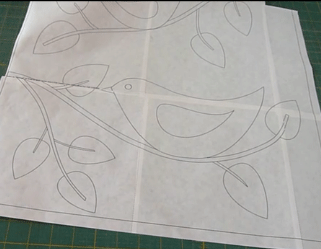
Transferring the Design to Freezer Paper:
Place the shiny side of the freezer paper onto your design, ensuring that the matte side faces up. Use a pencil or a pen to trace the design onto the matte side of the freezer paper, making sure to capture all the intricate details.
Cutting Out the Templates:
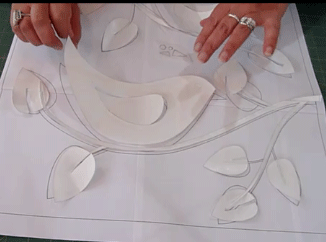 Carefully cut out the traced design from the freezer paper, following the lines precisely. Take your time and use sharp scissors for clean, accurate cuts. Remember, the templates will be the foundation for your applique pieces, so precision is key.
5. Essential Tips for Template Preparation
To ensure exceptional results, consider the following tips during the template preparation process:
- Always double-check the accuracy of your traced design on the freezer paper before cutting it out. Any errors or discrepancies at this stage can affect the overall quality of your applique.
- When cutting out the templates, hold the freezer paper firmly to prevent shifting or sliding, which could result in uneven edges.
- Store your freezer paper templates in a safe and organized manner to avoid damage or misplacement. Consider using labeled envelopes or ziplock bags to keep them secure and easily accessible.
What better way to understand this process than to see it visually? The following video covers the ins and outs, tips and tricks that I use in preparing my own freezer paper templates.
Conclusion
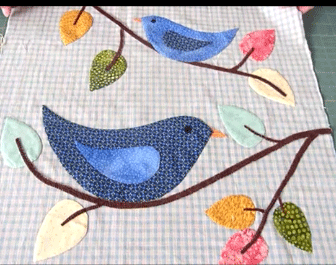
Preparing freezer paper templates is a crucial step in the hand applique process. By taking the time to accurately transfer and cut out your templates, you lay the foundation for a successful applique project. Remember to choose high-quality freezer paper, use the right tools, and pay attention to detail. Your dedication to template preparation will be rewarded with precise applique pieces and a quilt that truly shines.
 As you embark on your applique journey, explore the endless possibilities that hand applique using freezer paper and liquid starch offers. Combine techniques, experiment with colors and fabrics, and let your creativity soar. Applique is not just a craft; it’s an art form that allows you to infuse your unique style into every stitch.
Now, armed with the knowledge of preparing freezer paper templates, it’s time to bring your whimsical applique designs to life. Happy stitching!
 I am a self-learner. I taught myself to sew and to quilt. And I taught myself how to draw. I love to dye my own fabrics, am a fanatic of free-motion quilting, and dabble with mixed media. I am a quilt designer and teacher, and design and publish my own line of quilt patterns. With this blog I would like to share the bits and pieces of my life.