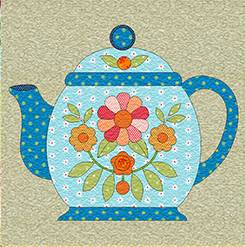
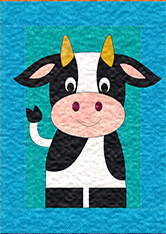
![]() If you’re a beginner quilter looking for a simple and effective way to add whimsical applique designs to your quilts, then you’re in the right place! In this blog post, we’ll explore the turned edge applique method using interfacing. With this technique, you can achieve clean, smooth curves and beautifully finished applique shapes without any raw edges showing. It’s a versatile method that works best for large shapes with shallow to moderate curves and small, simple shapes like circles, leaves, and hearts. Let’s dive in and discover how to create stunning applique using this approach.
If you’re a beginner quilter looking for a simple and effective way to add whimsical applique designs to your quilts, then you’re in the right place! In this blog post, we’ll explore the turned edge applique method using interfacing. With this technique, you can achieve clean, smooth curves and beautifully finished applique shapes without any raw edges showing. It’s a versatile method that works best for large shapes with shallow to moderate curves and small, simple shapes like circles, leaves, and hearts. Let’s dive in and discover how to create stunning applique using this approach.
What is Turned Edge Applique?
Turned edge applique is a popular technique in quilting that involves creating applique shapes with finished edges, giving them a polished and professional look. Traditionally, quilters would turn the fabric edges under manually and hand stitch them to the background fabric. However, this can be a time-consuming process, especially for complex designs. That’s where the turned edge applique using interfacing comes in.
With this method, instead of manually turning the edges, we utilize interfacing—a lightweight fabric material that adds stability and structure to the applique shapes. The process involves tracing the applique outline onto the interfacing, stitching it to the front of the applique fabric, making a slit in the interfacing, turning the shape inside out, and then stitching it to the background fabric. The result is a neat and clean applique shape with hidden raw edges.
How to Create Turned Edge Applique Using Interfacing
Now that we understand the concept, let’s dive into the step-by-step process of creating turned edge applique using interfacing. Grab your favorite applique pattern, some fabric scraps, interfacing, and let’s get started!
Materials Needed:
- Applique pattern
- Fabric scraps for the applique shape
- Fusible Interfacing
- Scissors
- Thread
- Needle
- Iron
 Step 1: Tracing the Applique Outline
Begin by tracing the outline of your chosen applique shape onto the glue side of the interfacing. You can do this by placing the pattern on a lightbox or holding it against a window to help you see the lines clearly. Use a pencil or fabric marker to trace the shape onto the interfacing. Make sure to trace the shape in mirror image if your design requires it.
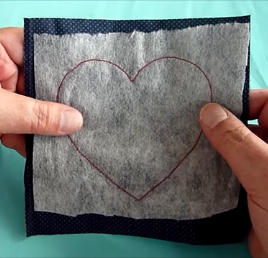 Step 2: Stitching the Interfacing to the Applique Fabric
Once you have the outline traced onto the interfacing, it’s time to stitch it to the front of the applique fabric. Position the interfacing on the front side of the fabric, with the glue side up. You can secure the interfacing with pins if necessary. Now, using a straight stitch carefully stitch along the traced outline. This stitching will act as a guide when we turn the shape in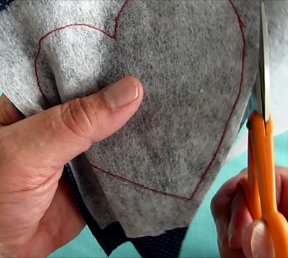 side out later.
Once you have finished stitching, cut the shape out, leaving a narrow seam allowance. Clip any points and corners, but do not cut any curves.
 Step 3: Making a Slit and Turning the Shape
With the interfacing stitched to the fabric, it’s time to make a slit in the interfacing, allowing us to turn the shape inside out. Be cautious while making the slit, ensuring it’s just wide enough to allow you to turn the fabric without damaging the stitches. Use a small pair of scissors to carefully cut a straight line through the interfacing, starting from the center of the shape and extending towards the edge.
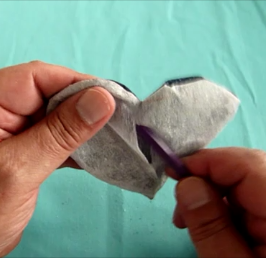 Once the slit is made, gently push the fabric through the opening, turning the shape inside out. Take your time and use a blunt object, like a chopstick or the rounded end of a pen, to carefully push out the corners and curves, ensuring they are fully turned.
 Step 4: Stitching the Applique Shape to the Background Fabric
Now that the shape is turned right side out, it’s time to stitch it to the background fabric. Position the shape on the desired spot of the background fabric, making sure it is centered and aligned correctly. Press the shape down with an iron. This will fuse the piece down, keeping the shape in place without the need of pins. With a matching thread color, stitch around the edges of the shape using a small invisible stitch, securing it to the background fabric.
 Take your time while stitching, especially around curves, to maintain smooth lines and avoid puckering. As you stitch, ensure that the raw edges of the fabric are tucked inside the shape, giving you a clean and finished appearance.
 Step 5: Finishing Touches
Once the applique shape is securely stitched to the background fabric, give it a final press with an iron to remove any wrinkles or creases. Be mindful of the heat setting based on your fabric type. Take a step back and admire your beautifully finished turned edge applique!
Why Choose Turned Edge Applique Using Interfacing?
Now that you know how to create turned edge applique using interfacing, you might be wondering why this method is worth considering. Here are a few reasons why this technique is popular among quilters:
- Clean and Neat Finish: The turned edge applique using interfacing creates a clean and polished finish, with no raw edges or loose threads sticking out. It gives your applique shapes a professional look.
- Time-Saving: Compared to traditional hand-turned applique, this method can save you a significant amount of time, especially for large, simple designs. It allows you to achieve finished edges without the labor-intensive process of manually turning fabric.
- Versatility: This technique works well for a wide range of applique shapes, especially those with shallow to moderate curves. You can create beautiful circles, leaves, hearts, and other simple shapes effortlessly.
- Stability and Durability: The interfacing adds stability and structure to your applique shapes, ensuring they hold their shape over time. It also helps prevent fraying and distortion of the edges.
FAQ
Q: Can I use any type of interfacing for turned edge applique?
A: While there are various types of interfacing available, it’s best to choose a lightweight fusible interfacing. This type of interfacing adheres to the fabric when ironed, providing stability without adding excessive bulk.
Q: Can I wash quilts with turned edge applique using interfacing?
A: Yes, quilts with turned edge applique using interfacing can be safely washed. However, it’s essential to follow the care instructions for both the interfacing and fabric to ensure the longevity of your quilt.
Q: Can I use the turned edge applique method for complex and curvy shapes?
A: While turned edge applique using interfacing works best for large shapes with shallow to moderate curves and small, simple shapes, it may not be suitable for extremely curvy or narrow shapes, or those with inside holes. For such designs, other applique techniques like needle-turn or raw-edge applique may be more appropriate.
Join the Applique Journey!
Are you excited to try out turned edge applique using interfacing? It’s a fantastic method that can add charm and whimsy to your quilts. Whether you’re a beginner or an experienced quilter, this technique offers endless possibilities for creating beautiful applique designs.
We hope this blog post has inspired you to explore the world of turned edge applique. For a hands-on example of this method, check out the video tutorial below. Feel free to leave any questions or comments below, and happy quilting!
 I am a self-learner. I taught myself to sew and to quilt. And I taught myself how to draw. I love to dye my own fabrics, am a fanatic of free-motion quilting, and dabble with mixed media. I am a quilt designer and teacher, and design and publish my own line of quilt patterns. With this blog I would like to share the bits and pieces of my life.